* This post was previously posted in edited form at Donna's Funky Junk Interiors *
Totes can be used for anything from holding tools to flowers, they can be used in the garage, the living room or on the kitchen table as a centerpiece. Although old ones are found at garage sales or resale type shops, sometimes they are hard to find, so let's make one!
This is a very easy project that anyone can do with very few tools. I will explain it step-by-step with a lot of photos.
What you need
- wood planks old or new (we'll get to the dimensions later)
- plywood
- a dowel, old rake handle or branch
- jigsaw or handsaw
- drill
- drill bit
- hammer
- nails
- pencil
- scrap of cardboard (to make the template)
- measuring tape or ruler
Wood Planks
I've used old barn board plus new pine to make my totes. Because they can be made in practically any size, it's hard to give actual dimensions but I will give a guide. If you find some planks you can use that as the width of your finished tote, which will mean that you don't have to cut the board widthwise, just lengthwise.
This shows the basic pieces you will need:
Here are some old barn boards I had. The top two I will use for the sides, they are about 3 1/2" wide. Boards sold as 1" x 4" are actually 3/4" x 3 1/2" wide, perfect for the side pieces. The bottom (third piece shown) is about 5 1/2" wide. Most boards sold as 1" x 6" will be about 3/4" thick by 5 1/2" wide. This width will work out well for the end pieces.
As I said previously, you can use wood that you have. Old fencing or decking is perfect, but you can also buy new if you like. The side pieces will be thinner than the end piece. Of course you could also cut a wider piece down the middle to make the two side pieces.
The length to cut the side pieces would be the approximate length you want your tote to be. My side pieces are 12 1/2", they sit inside the ends which are 3/4" thick, so the tote will end up being 14" long. Cut them to length with your handsaw or jigsaw.
To determine the length of the end pieces, this will be the height of your tote. If you know for sure what you want to put in it, you can use that as a guide. Make sure you leave room so that what you are putting in the tote can fit with the handle in place.
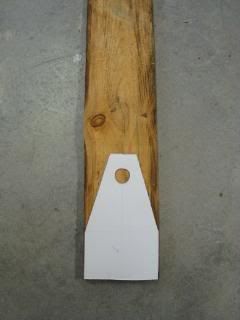
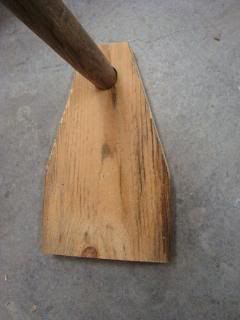
I made a template with a piece of cardboard from a cereal box. The width is the width of the wood for your end piece.
The angle starts after you have reached the height of your side pieces. In the case of using the 3 1/2" wide pieces, you will go up 3 1/2" and then slant on an angle towards the middle of the top. Leave enough space for the dowel to fit into the top with some wood above it. This is hard to explain, but if you look at the picture above it will be clearer. The height of my piece and template is 9 1/2", the straight part across the top of the piece is 2" long.
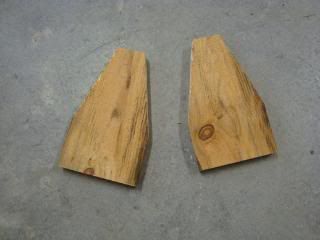
 Trace around your template onto the end pieces of wood, you will need two and you can easily cut them with a handsaw or a jigsaw.
Plywood
A piece of plywood is needed for the base. It will be the length of the finished tote (14" in the case above) and the width of the end pieces (5 1/2" in the case above).
I had some leftover plywood that was 3/8" thick. Any thickness will work and you can even use a piece of 1" x 6" if you like, it's just nailed on the bottom. Wait to cut it to size until you've put the rest of the tote together. This way you get the perfect size.
Dowel, handle or branch
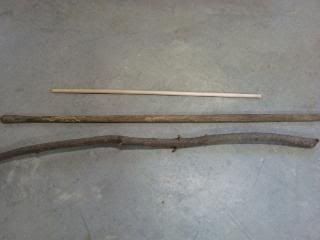
I found a rake handle that had broken from the rake head. It was destined for the burn pile, but I saved it. For the pine tote I made I used a purchased hardwood dowel. They are available in different diameters at any hardware or building type store. You can also use any branch, preferably one that is pretty straight. Your dowel needs to be about the length of your tote, but don't cut it to size until you've made the other pieces.
Shown here from top to bottom: a dowel, the rake handle and a branch:
Once you have decided on what you are using for your handle you will need to cut out a hole that same diameter in the inside of the end pieces. You want to make your hole for the handle just half-way through the end piece. So that is approximately 3/8" deep for a 3/4" thick piece. This way the handle is stuck between the end pieces and cannot fall out.
The best way is to use an electric drill or drill press with the correct drill bit, which would be a forstner bit if you have it. They come in different diameters and cut a nice clean-bottomed hole. You could use a spade bit but it will make a smaller diameter hole right through the wood because it has a center point that goes deeper than the hole you are drilling. If you use that you will need to plug the smaller hole or put a screw into it and into the end of the handle.
I took a photo of both to show the difference. The forstner bit is on the left and the spade bit on the right:
Mark the hole on your wood first so that you can center it and both sides will match. I put mine about an inch down from the top:
Stand up your end pieces and put the sides in between where they will go. Measure for the length of your handle by resting it on top of the ends. Each end of the handle will sit inside the hole in the end piece. (Pretend in the photo below that the hole has already been drilled) Your handle will be shorter than the outside length of your tote. Mark the length and saw to the correct length carefully.
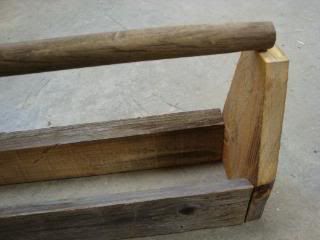
Put your handle in the holes and make sure the sides and ends fit tightly together. (If the handle is too long it will push the ends out) Put one end piece down on a firm surface and nail the opposite end piece into the side pieces. I even used old, used nails. The nails should be long enough to go through the top piece and at least an inch into the bottom piece. Line up the nails carefully so that you attach two right into the end of each side. This photo will give you a better idea than my explanation:
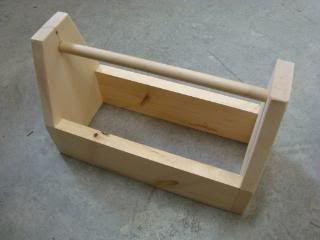
Flip and nail the other end piece on. Here's the pine version:
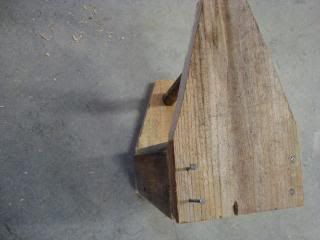
Turn the tote upside down and measure and then cut the size of the bottom. Nail it on with smaller nails if you are using plywood. I used finishing nails, with three across each end and 3 or 4 more down the sides.
These totes can be finished in any way you can think of. You may find that if you cut old wood, the cut edges are lighter than the rest. The plywood also might not match. I explain how to fix that in another post HERE.
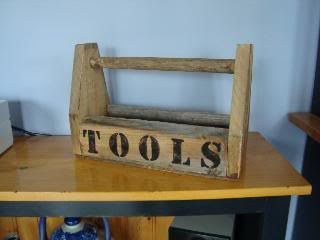
I stenciled TOOLS on the side of one of the totes.
The pine tote, I painted white and then painted "Flowers" on one side and "Les Fleurs" (French for flowers) on the other with a little flourish on each end. It was then distressed to look old:
Donna and I are hoping you will make your own and post it at her special tool box party here
I have also made and blogged about a different type of barn board tote in the past, it is a divided one and you can read about it HERE.
Everything I make is for sale, so if you see something you like, please contact me.
Labels: barn board, pine, tote


.jpg)
