This is the tutorial on how to change a drawer to fit around plumbing when changing a commode or dresser to a vanity. The Bathroom Renovation series starts
here.
When choosing a piece of furniture that will become a vanity you need to check for two important things. What is the height of your piece and what is the depth of it? The height you need will depend on your sink choice. I am not a fan of vessel sinks. Those are the type that sit on top of the counter and usually require a 3" diameter hole cut into the top for plumbing. I don't like the distance between the top of the sink and the counter top, I prefer the sink to be closer to the top. If you go with a vessel sink, your dresser would need to be a bit shorter in height to allow for the height of the sink.
Of course a regular type sink sits completely inset into the counter top, so that requires a much larger hole for the sink and a standard height for the dresser, similar to a store bought vanity.
The sink we found is half into the counter and half (about 3") sits up above the counter top. It was perfect for what we had in mind for our bathroom. Our commode has little wheels on it that add to the character, but could have been removed if we needed the sink to sit lower.
You also need the depth of your piece to fit the sink. The diameter of our new sink was 18" at the top and so it had to fit front to back on the commode and still allow an overhang for the top as well as a bit of room at the back. It just fit exactly to the top without much room to spare.
Your sink will come with a template of what size to cut the hole. I used painters masking tape (after stripping and clear-coating the top) and marked the center, as well as the hole size, which was 13", with pencil.
This was cut out with a jigsaw after making a large pilot hole with my drill.
Our plumbing came up through the floor. It was ideal for this type of vanity, and may not be best for one that has all drawers because it would mean that each drawer would need to be altered.
Because we have one drawer and two doors, I just reconstructed the one drawer. We fit the commode over the fittings that came up through the floor and I made a new plywood bottom for the vanity with cut outs where the cold and hot water and the drain pipe came up. This way the back of the vanity was not cut nor changed in any way.
Although my husband does not like plumbing, he is good at it and hooked up our new faucet and sink.
So this leaves us with a spot for the drawer to fit into. You can see that the drawer will not run into any plumbing on each side after I push the one flexible water pipe in behind the drain.
This is the drawer from the top, it has dovetails where the front meets the sides and has grooves where the back fits into the sides.
From the bottom you can see that the drawer bottom fits into grooves around the front and sides of the drawer. (This is the proper way to construct a drawer, the drawer bottom is not screwed nor nailed onto the bottom of the sides, it fits into the sides with the grooves there and does not need any glue nor fasteners to hold it in place.)
In order to have a drawer that will fit around the plumbing I needed to find exactly where the plumbing was. I measured from the front of the cabinet to where the drain pipe came up through where the drawer would sit. I also measured the width of the drain pipe and added a little for extra movement.
Then the first step was to cut a slot into the drawer bottom.
My drawer was already coming un-glued so that helped me to be able to take off the front piece and slide the drawer into where it would sit in the vanity.
Here I show the drawer sitting back in place with the slot cut out.
The next step was to see where the slant of the sink came toward the front of the drawer. While it sat there I took a thin piece of card board and drew on the shape of the sink bottom.
I then had to cut three pieces to reconstruct the sink. (Actually since I don't have a workshop, nor most of my tools, I had a kind neighbour cut these pieces for me) The sides for the slot will be the same height as the outer sides of the drawer. They have a dado (groove) cut into the bottom so that the drawer bottom will fit into them. They also have a groove at the back so that the drawer back fits into them. And they have a rabbet at the front that the front piece is glued into (This might be more obvious in the photo after this one)
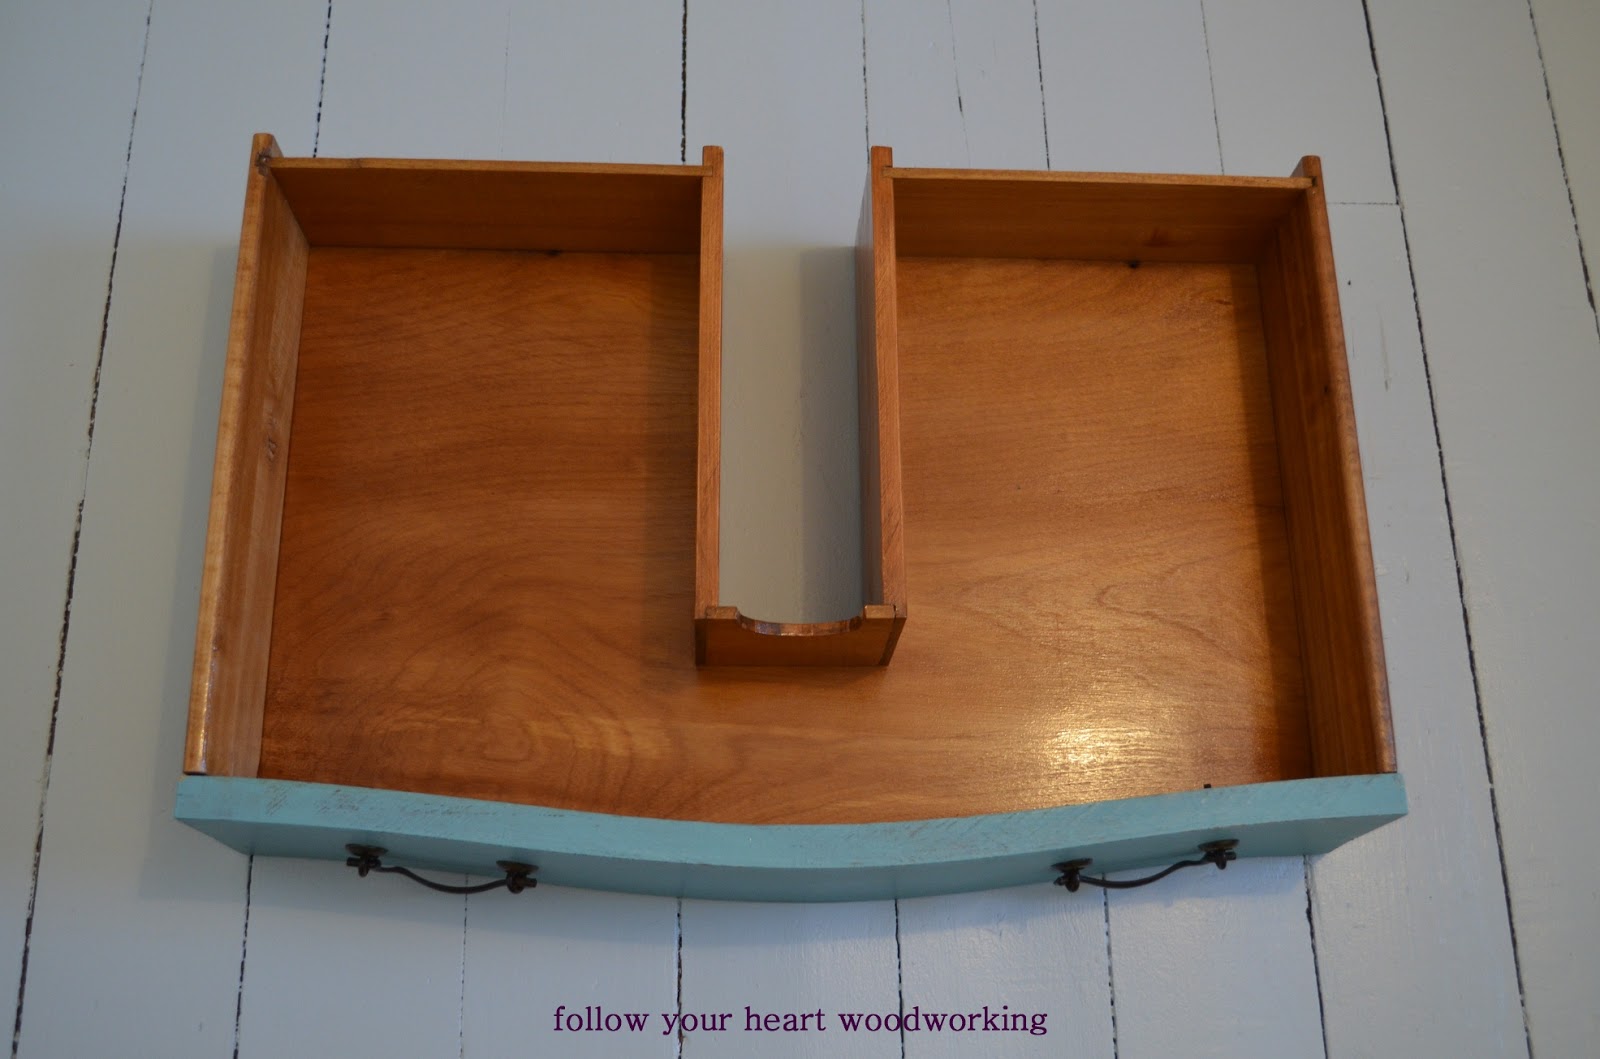
The small front piece (which is cut from the leftover piece I cut out of the back of the drawer when making the slot cut) has a half circle cut out of it to fit under the sink. If this were square across the top the drawer would not sit completely into the vanity.
Here are the pieces dry-fitted together, and the following photo is a close-up which, hopefully, will make my descriptions more clear.
Close-up:
I stained the new pieces to match the old and glued the front piece to sides as well as the sides to the two original back pieces and glued the front back on:
It fits! And this allows us to still use the drawer as there is a lot of room on both sides of the slot for the plumbing.
I hope this helps some of you who are converting a commode or dresser into a vanity. Please don't hesitate to ask questions if you have any!
Sharing at these parties:
My Repurposed Life - Catch as Catch Can
Knick of Time - Vintage Inspiration Party
The Interior Frugalista - DIY Sunday ShowcaseLabels: bathroom, home renovations, sink, tutorial