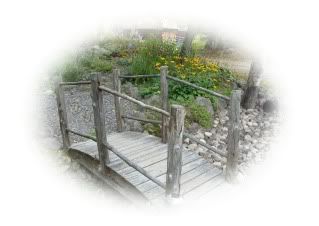
Once upon a time I had a beautiful bridge that I made myself out of reclaimed pallet wood and logs. It looked like this:
Unfortunately, pallet wood doesn't like to be outdoors and because of Mother Nature and her rain, snow, sun and cold... untreated wood and logs decay.
I even had woodpeckers hammering into the logs that were used as posts, creating big holes in them. Two of the log posts even fell right off.
Some of the pallet boards caved in. A sorry site for a once beautiful rustic creation.
I decided to leave the base underneath and replace the boards with pressure treated decking.
First step was to dismantle the thing, starting with the remaining posts, which had lag screws holding them to the bridge base. A socket wrench makes easy work of taking out the screws.
Then, using an electric drill I removed all the screws that held the pallet boards onto the base.
I bought 1" thick, 6" wide (actually 5 1/2") boards at Home Depot. I needed them 3' long and didn't want to take 12' boards home in my van, so the nice man at HD offered to cut them for me to 36". That saved me a step.
I spaced them out across my bridge base leaving a gap between each board for water run off, just as you would for a deck. I found 1/8" thick poplar boards in my shop that would leave the perfect spacing to fit seven boards on each half of the bridge... 14 boards in total. Spacers make the job go easier, you just fit them between the last board you attached and the next one and you get an even spacing for your whole project. This is just a lay out to see how things will fit.
I then started in the middle of the bridge and worked down one side. This way the middle of the bridge had the 1/8" gap centered on it. I used two 2" screws and attached through to the base on each side, leaving a 1 1/2" overhang.
(Always be sure to use the correct screws or nails for pressure treated wood. If you don't, the screw could be eaten by the concoction that is in the wood to keep it from decaying.)
After the first board is in place, I put the spacers in place and pushed the next board up tight and attached it, working my way down to the bottom where the bridge meets the ground.
For this project I had a great helper who didn't complain, just enjoyed the November sunshine with me. Here in Northern Ontario one is not normally working in the garden during the first half of November!
When I got to the last board, I saw that the base 2" x 12"s had decayed where they meet the earth. Instead of replacing the whole thing, I added some pressure treated scraps to the inner base to attach the last board to.
Of course I was left with the old boards and logs and almost kept some of them... I did keep the handrails, but all the rest was cut up to go into my woodstove.
Now, I suppose next spring I will add posts and handrails, but for now it's just the boards.
Definitely not as nice as the previous bridge, it has no character and isn't rustic, but it will hold up in the weather and no one will put a foot, or a paw, through it.
Now to rake the leaves before the snow falls...
Posting at the following Parties:
Funky Junk Interiors
Dittle DattleLabels: pallet wood