I live in Northern Ontario, probably closer than most of you to the North Pole and I have a really nice little log barn that sits about 70' back from the road. For years I have wanted to put a decoration on the dutch door (door that is divided in two horizontally) that faces the road. I wanted it to appear as if Rudolph was inside the barn looking out. Fortunately we have had a very mild November, and a chance for me to to work on the decoration ideas I had in my head.
Here's the before photo:
.jpg)
First I had to measure the top opening, just above the horizontal wood piece, so it looks like he is leaning out over the bottom door section. I didn't have a piece of plywood tall enough to fit the opening, so I just cut it wide enough and then I will piece it together to make the top, where it will say Merry Christmas. After looking at the size, and drawing it out on paper, I realized "Merry Christmas" was too wide to fit across the opening without looking jammed tight in there. It would be hard to read, so I revised the plan and decided to just have "Merry" at the top and "Christmas" at the bottom.
So, I drew out a reindeer after getting inspiration from looking at some clip art on the internet. I wanted it to be a cartoon type reindeer, not lifelike. I painted the background with two coats of black exterior paint and used some wood stain for Rudolph's body and face colour, because that's all I had that was brown. The wood stain had to be covered with a clear coat, so I used some outdoor spar varnish I already had.
The start of Rudolph:
What I wanted to do was have Rudolph's antlers stick out from the plywood. I freehand drew and cut out two, mirror images, out of plywood and coated them with the varnish.
Two antlers:
For the wood parts of the sign I cut two pieces of plywood and painted them with two coats of red exterior paint. I sketched the word Merry for the top part and Christmas for the bottom part. The words were then painted with two coats of green exterior paint.
The start of "Merry" on the top piece:
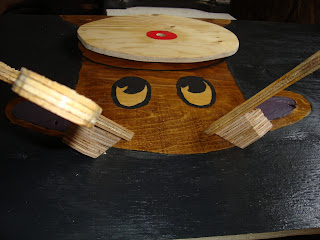
Apparently I hadn't planned well for the lighting of Rudolph's nose. The large plywood would be screwed flat to the barn door and I needed a way to have a red Christmas light for his nose. I decided to make a new "snout" for him, which was raised up off the base of the plywood. I cut a large circle out of plywood and attached it raised up on two scraps of wood just enough to allow the bulb's base to sit underneath unseen. I cut a hole for the bulb and then painted red around the area the nose would be. The light string then travels under the snout and out the side, so no ugly plastic shows there.
Also, how to attach those antlers? I cut the bottoms of them on an angle and then made matching angled plywood pieces to attach to the base. This way the antlers sit angled out from his head. (Afterwards I painted the antler braces black so that they wouldn't show up).
View of the new muzzle and the antlers attached:
I decided to have his hoofs hold the bottom part of the sign. I made the two legs out of plywood, stained to match the body, with two black hoofs at the bottom, which could be screwed to the "Christmas" part of the sign, and then attached to the body at the shoulder area.
Here's the legs and bottom sign:
Here it is all attached to the barn door with the string of lights around the whole thing:
As you can see, it snowed overnight so I got it up just in time... here comes winter!
Here's what he looks like lit up at night (it doesn't show here but his nose does shine red in real life!):
I'm quite sure no one has the same log barn as I do, but I hope I gave some of you some ideas for your own creations.


Julie... that is so cute! I love how it looks at night!
ReplyDeleteThanks for your suggestions on today's post about the former hutch topper. I had never thought about turning it upside down! how clever!
gail
LOVE this sooo much! Too cute!
ReplyDeleteThis is just darling! You are too talented!
ReplyDelete@cheapchichome.blogspot.com
I love your Rudolph,, it looks so cute all lit up. Very creative
ReplyDeleteI LOVE this!
ReplyDeleteThat is just adorable, especially all lit up.
ReplyDeleteI love the Rudolph Door! It really catches the magic of the season .
ReplyDeleteBlessings,
~Myrna
Oh my goodness! So cute! I love it with the lights on. That is such a fun Christmas decoration. Great job, as always.
ReplyDeleteHello from Southern Ontario! He is so cute, and I am in love with your log barn. We dream of finding property with an old barn one day.
ReplyDeleteSo cute! Love the spot light on it! Thanks for linking up at the "Get Your DIY On" link up party! Come back on Sunday with your Thanksgiving or Christmas table!
ReplyDeleteReally loving this sign! It's adorable and your wood work was amazing! I am featuring it on my blog tomorrow:) Thank you so much for linking up to Get Your DIY on!
ReplyDeleteMandy @ The Hankful House Blog